The BEST tips, techniques, and production secrets on the web

The BEST tips, techniques, and production secrets on the web
© 2018 Dubstep Production Tips - The BEST online resource for dubstep production tips, techniques and industry secrets!

Thursday, December 14, 2017

Pioneer XDJ-RX2 Review & Analysis

View the XDJ-RX2 on Amazon: http://amzn.to/2AFzeIq
Reviewed by Alan Caldwell


The most striking physical difference between the XDJ-RX2 and the RX1 is the inclusion of 8 RGB pads per deck that replace the 4 button pads of the older model. The playability of the RX2 in this regard has a much more modern feel with ease of access and fluid streamlined layout. But this is just the beginning.

Now comes the good stuff... The overall layout of the mixing knobs & buttons are enhanced with a thicker, more rigid feel that lends to the step up in quality. There is a sense of relative durability here that was lacking in the RX1. The Sound Color FX that was formerly in a vertical layout on the RX1 is now arranged in a square grid style that matches the layout of the Pioneer DJ-750MK2, a move that further lends the idea that this is a serious piece of DJ equipment not to be overlooked by the pros.

A major highlight is the advent of the touchscreen display panel that allows for QWERTY search, needle search, shortcut and track filter. One problem with the original RX1 that is improved with this model is the replacement of the middle navigation knob by sliding this component to the right of the screen which aids immensely in playability and in keeping your path clear for rapid adjustments. I personally found this to be one of the better improvements on the RX2. 

User-friendly touchscreen and display feature for easy navigation
The RX2 is fully equipped with a free license for Pioneer's hallmark Rekordbox DJ software. One advantage of this, if you are a laptop purist, is that you can connect to the Rekordbox export feature on your computer with USB which facilitates the ability to load and drop music directly onto the decks from your library without having to add the step of exporting onto a USB beforehand.

If you plan on connecting the RX2 to a larger rig, think again: Pioneer has, for reasons unknown to us, decided to remove the Ethernet port. Not the end of the world, however, as the need to do so is totally not necessary, what with the immense power and features that the RX2 comes equipped with. I myself find that the package as a whole is wonderfully powerful and leaves very little need for anything to supplement this rig — you have an all-in-one megaship of a unit with the RX2!

Overall, the Pioneer XDJ-RX2 is an immense force to be reckoned with, should you immerse yourself in the abilities of the Rekordbox DJ software (again, this comes free with the RX2). As far as anyone wondering whether or not to upgrade to the RX2 from the original version, I can say with 100% confidence that this unit will make you very glad you did, especially considering it takes advantage of the most optimal features of the Nexus2 system at a fraction of the price. I am thoroughly impressed with what Pioneer has accomplished with the RX2 and I am proud to call myself a Rekordbox convert.

SHOP NOW:

Wednesday, December 13, 2017

Product Highlight: Pioneer Pro DJ XDJ-RX DJ System

Pioneer Pro DJ XDJ-RX on Amazon: http://amzn.to/2C2cfn4
Reviewed by Stephan Arturo

An absolutely mindblowing deck — it gets no better for the money! (Have a look on Amazon: http://amzn.to/2C2cfn4) This is an all-in-one DJ console, meaning you do NOT need a laptop to get the party started. Just insert your tracks via the two USB ports and the rest is magic. The XDJ-RX is perfect for both the beginner transitioning into an intermediate level of DJ-ing to the master turntablist alike.

What I find most attractive is the fact that this is truly an all-in-one unit. In today's economy, it is hard enough to save up enough money for a decent laptop to carry you through your setlist, never mind the actual DJ gear to make it all possible. The XDJ-RX addresses this need and solves it with the high-quality alacrity that only a name brand like Pioneer can provide. That being said, for the purists out there, the ability to link the RX to your laptop is possible although I have not personally had the chance to give it a go. And I am perfectly okay with that, as the USB storage feature has fared me well thus far.

The mixing features are pretty standard: you have your filters, effects plugs, midi control buttons, and of course very fluid turntables. The LCD display could, in my opinion, benefit from being slightly larger. The track navigation feature pissed me off quite a bit as I found myself scrolling through my songs to reach the one I wanted, finding myself thinking this method seems a bit "dated."
If I were Pioneer, I would certainly take the LCD screen feature to the next level and include more in depth navigational functions to make transitions more fluid and user-friendly, like perhaps including a touchscreen scroll feature. This would have undoubtedly eased my experience in the song navigation department. That said, navigation itself works perfectly fine, so if you don't mind pushing arrow buttons you probably won't get as peeved about this as I did. Overall, not a deal-breaker for me, just a little annoying.

You can connect additional turn tables which I understand is a huge plus for the purist vinyl DJs out there. I couldn't care less about this personally, but I know that many of you will appreciate this option.

Overall reaction: this thing rules. Like, really. I love it to pieces and I am very happy with the ease at which all components and features come together to bring you one SWEET powerhouse for a fraction of what you would pay for the additional gear you would otherwise need if you went the traditional route. The all-in-one Pioneer XDJ-RX controller is absolutely fantastic for the price. I highly recommend it to beginners and pros alike.

SHOP NOW:

Friday, December 8, 2017

Sub-Bass Explained: How To Create The Industry's ABSOLUTE BEST Sub Bass for Your Dubstep and EDM Tracks


Having an understanding of frequency ranges pays off big time no matter what style of music you are producing. In a nutshell, frequency range is what makes your tracks hold their unique position in the mix. When EQed properly, frequency is what helps lead vocals and instruments stand out as they are meant to, keeps the low and high ends of all sounds from contributing unnecessary noise, and ensures an overall balanced mix. In respect to frequencies, the mixing stage could just as appropriately be called the “balancing” stage as the idea behind EQing frequencies to blend amongst themselves is essentially this — a balancing act. Today we will be starting things off with the most iconic frequency range of all when it comes to dubstep — sub bass.

Sub bass is, in short, it is what lends the deep, thundering quality to dubstep sounds — the kinds that make people shudder in awe while their subwoofers are being destroyed. Think mono sine waves pitched down (-1 or -2 octaves) almost reminiscent of those oldschool hearing tests they made you raise your hand for in the school nurse’s office — but much more intense. You can barely hear them but you know they are there. You feel it. In dubstep, sub bass is meant to be felt.


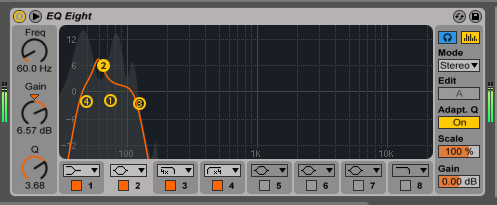
Sub bass frequencies lie between 16-60Hz. When applying sub bass, make sure to cut out all frequencies below 16Hz using a high-pass filter. This will rid your track of unnecessary low-end noise. Sub bass is meant to be deep, obviously, but anything below 16Hz will only make your mix more cluttered. The effect of your sub bass can be felt most powerfully with a clean mix that utilizes the proper frequency ranges. (As a rule of thumb, it is important to cut these extreme low-end frequencies with just about all of your tracks as to free up room for your bass and kick tracks and eliminate noise.)

A sub bass can be added as an individual track that follows all of your bass and lead melody lines, or as a supplemental component within a synth patch itself. If you are using Native Instruments’ Massive for one of your bass patches for example, try setting an unused oscillator to a sine wave with the intensity brought all the way down with the bend mode set to Spectrum. Pitch the oscillator down an octave (-12 steps). You will get a full-bodied sine wave that will mimic whatever the bass is doing with the other oscillator(s).

Depending on the manner of filtering that your patches are routed through, it might be in your best interest to make a duplicate of your bass track and make the sub on this separate track rather than in the main bass patch itself. By duplicating the track, you will have created an identical version of your sound. Now, make that duplicate act as the sub bass. What you want to do is turn off all oscillators, effects and inserts except for oscillator one, which you can then set to the aforementioned sub bass parameters. (Spectrum bend mode, intensity all the way down, wavetable set to sine) If you handled this correctly you should be left with a sub bass that mimics exactly what your main bass line is doing. Tweak and fine-tune if necessary, and make sure to lower the volume of the sub bass so as to ensure that it acts as a “supplement” rather than a mask over top of your main bassline.

Every sound you create must be treated subjectively, and therefore may likely require some different methods of tweaking in order to get a sub bass that will benefit your sound in the best way possible. Use your ears and experiment. For example, if your main patch includes a modulated band reject filter sweep, go to your sub bass duplicate track and try experimenting with the filter setting to see if you can come up with something even more exciting than a sub bass sans filter.

On the contrary, I personally find most of my own projects benefit from the simplicity of a sub bass track that features nearly no modulation whatsoever in regards to waveform or effects/filters. The simple power of a Spectrum sine (with a possible low pass filter if necessary) played in conjunction with the melody of the bassline is exactly what is called for. Anything more would result in a lack of signal power, that is to say, a sub bass that falls short of doing what it is meant to — put the final, giant nail in the coffin of your low-end.

Use sub bass for all of your bass sounds and even try using it on lead or melody instruments to see how it affects their potency. A great example of sub bass used in conjunction with a lead synth can be heard in Skrillex & Damian Marley’s “Make It Bun Dem,” specifically between 0:40-1:08 (http://www.youtube.com/watch?v=PR_u9rvFKzE). Notice how the pulsing of the lead can be “felt” through your sub. This is the effect of a carefully-sculpted sub bass. I know firsthand that this particular sound uses a direct sub bass within the patch itself as I had the pleasure to remix this song for my solo project 11:11 (http://www.youtube.com/watch?v=ZeI4F78D1K0). The pulsation of the sub frequencies really give this lead a jarring, stabbing force and presence that an otherwise untreated lead would not.

Dubstep would not be dubstep without sub bass. It is one of the most simple yet profound aspects of the entire genre, and that of pretty much any subgenre of modern day edm. No matter how interesting and powerful your new Massive patch might be, make sure to take the extra time to consider the aspect of sub bass and how it relates to your sound. If it is lacking, duplicate that baby and make a separate sub! I would personally suggest to make it a habit of creating a separate track that you will dedicate to any and all sub basses in every one of your songs, but that is ultimately up to you. The key is making sure it is present, one way or another.

Alright, ladies and gentlemen, there it is, sub bass, plain-and-simple! The power of the sub is in your hands now. Use it wisely. Or unwisely. Whatever sounds cooler…